
Calculate Rooms or Spaces
|
ElumTools is designed to utilize Revit's Room and Space bounding elements for easy interior lighting calculations.
Before using the Calculate Room or Space commands, luminaire instances should exist in the target Rooms or Spaces, or Daylighting Mode enabled and set to compute daylight only. You can also use ElumTools Layout Assistant or place luminaire instances manually. |
|
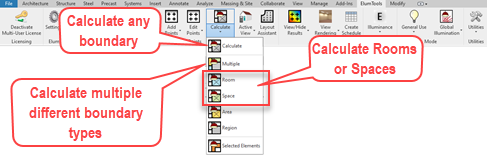
When selecting the Calculate Room or Space commands, ElumTools will allow you to select a single Room or Space and proceed to compute the results. Multiple Rooms or Spaces can be computed by selecting the Calculate Multiple version of the command. You may also select as many Rooms or Spaces as you desire in Revit directly, then simply click the main Calculate button on the toolbar.
The Calculate Room and Calculate Space commands are essentially identical, with the exception that the Calculate Room command only finds Revit Rooms when selecting areas to compute and the Calculate Space command finds only Spaces.
Room or Space Calculation Procedure (single Room or Space)
- If you have not yet placed Calculation Points in the areas of interest you may want to cancel this command and do this first.
- Select the ElumTools Calculate Room or Space command.
- Select the Room or Space of interest.
- As the calculation process begins, ElumTools will open a visualization window displaying an interactive rendering for the Room or Space.
- Calculation Points are visible in the rendered environment if enabled from the Display Options menu. They are also visible using the ElumTools View/Update Results command.
Multiple Selection
ElumTools allows the selection of multiple Rooms or Spaces enabling a series of offices or areas to be completed in a single execution of the command.
To fully understand this process, consider the following examples:
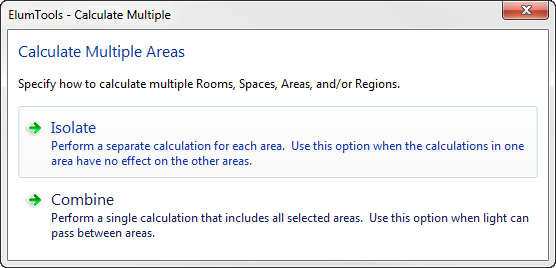
Imagine a hallway leading into a larger space. These may be designated as two different Rooms or Spaces in Revit. However, an accurate lighting calculation must consider the contribution of luminaires in each space to the other. In this case, you would elect to "Combine" the two Rooms or Spaces into one calculation.
Now imagine a series of offices or hospital rooms. These Rooms or Spaces are essentially separate calculations with no need to really consider light escaping from doorways. In this case, "Isolate" the calculations from one another for faster processing.