
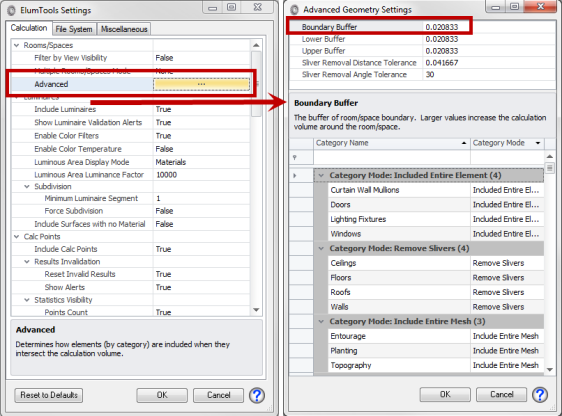
Advanced Geometry Settings
ElumTools employs advanced geometry seeking routines used to expand the calculation volume of Revit's Room and Space boundary tools. The rules governing their performance can be adjusted from the Advanced Geometry Settings dialog shown below (available by clicking the Advanced button under the Rooms/Spaces section in the Settings dialog).
|
For each setting listed in the top of the dialog (ex: Boundary Buffer), an adjustment can be made to the numeric "buffer" value to create an expanded calculation volume in which additional geometry will be retrieved for lighting calculations. Larger buffer values increase the size of the calculation volume by adding to the traditional Room or Space boundary. Adjustments to these values may become necessary to include an entire geometric element which extends beyond the current boundaries.
For each Revit geometric category additional instructions may be necessary and can be adjusted in the lower portion of the dialog.
When boundaries are expanded you will notice additional geometry outside of the Room or Space in the ElumTools viewer. These small surfaces are called "slivers" and ElumTools is set to remove them in many cases by default.
Sliver behavior is generally not important in terms of calculated results as these surfaces are shielded from light within. However this may not always be the case and adjustments may be required in this section. Lighting Analysts support staff may instruct you to make changes to these settings in special circumstances. |
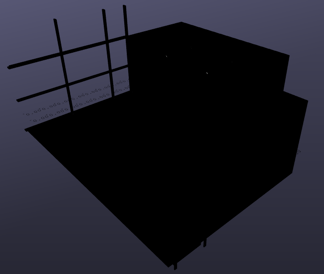
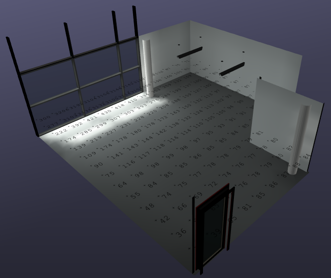
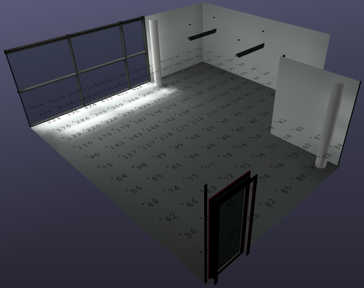
Example*
* NOTE - This example is instructive, however, instead of using a Room or Space, you could use a Region and avoid the entire issue.
The concepts employed may best be understood through an example. Consider a room with a curtain wall where we wish to compute daylight component without electric light.

Settings
Boundary Buffer - The distance added to the horizontal Room or Space boundary definition as a buffer to find geometric elements. Larger numbers increase the buffer size to find more geometry. Larger numbers may also increase the sliver size for elements extending beyond the original room or space boundary.
Lower Buffer - The distance added to the lower Room or Space boundary definition as a buffer to find geometric elements. Similar behaviors to Boundary Buffer in terms of slivers may be encountered.
Upper Buffer - The distance added to the upper Room or Space boundary definition as a buffer to find geometric elements. Similar behaviors to Boundary Buffer in terms of slivers may be encountered.
Sliver Removal Tolerance - Slivers are caused by increasing the size of the calculation volume using the Buffer settings above. Increase the size of the removal tolerance to capture more slivers. Caution, increasing the value too much may cause desired elements to be removed from the calculations inadvertently!
Sliver Removal Angle Tolerance - An increase in the angle tolerance may help remove slivers. Caution, increasing the value too much may cause desired elements to be removed from the calculations inadvertently!
Category table
|
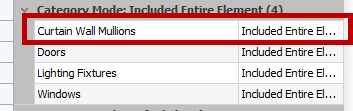
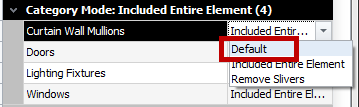
Each Revit Category can be set to one of three possible behaviors: Default, Include Entire Element or Remove Slivers. The defaults provided by ElumTools should cover most cases. However, in some circumstances it may be helpful to adjust the behavior as illustrated in the example above.
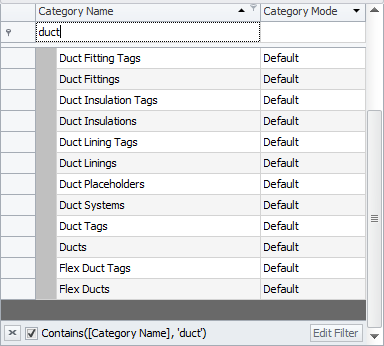
The table can be easily filtered using the column headings. For example, you can find all the categories beginning with the word "duct" by entering the text in the category heading. Or, you can sort by any of the three category behaviors (Default, Include Entire Element, Remove Slivers) using the column heading for "Category Mode". |
|
Default - The default behavior includes the portion of the element contained within the calculation volume (Room or Space boundary plus buffer parameters) and omits the portion of the element outside of this boundary.
Include Entire Element - This setting includes all geometry of any element (in selected category) if any portion of the element is contained within the calculation volume.
Remove Slivers - Attempts to remove any excess geometry that is outside of the Room/Space boundary but within the calculation volume.